


MAY 12, 2020
Cleaning your car’s headlights
So you want to clean your car’s headlights? Well, you’ve come to the right place. Your headlight lenses may have gone yellowy over time, become fogged or filthy, or might have found new purpose as a terrarium for indigenous worms and insects. The Drive’s crack How-To department is here to help get those lights luminous once again.
Driving with crappy headlight lenses isn’t just unsafe for you, tootling along in the inky blackness of night, but also for others on the road. Restoring your headlights to fresh-from-the-factory clear is also one of the easiest ways to make your aging ride look like new. The bottom line is your lenses need a good polishing, and here’s how to do it.
Basics
Estimated Time Needed: 30 minutes to 1 hour.
Skill Level: Beginner
Vehicle System: Lighting

Safety
Working on your car can be messy, especially when you’re cleaning surfaces you’ve never bothered to clean before–hello, bug-splattered headlight lenses–so here’s what you’ll need to keep your jeans, shirt, and self spotless.
- Mechanic gloves to protect your hands.
- Long-sleeve shirt to protect your arms.
- A mask or ventilator to filter chemical fumes and odors.
- Eye protection.
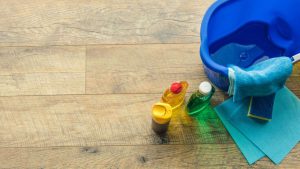
Everything You’ll Need
We’re not psychic, nor are we snooping through your toolbox or garage, so here’s exactly what you’ll need to get the job done.
Tool List
- Paper towels
- Spray bottle of water
- 3 microfiber towels
- A bucket for soap and water
- Sander/polisher–optional
Parts List
- Headlight restoration kit
- Painter’s tape
- Sandpaper in a selection of grits (i.e., 1000, 2000, and 3000)
- Polish and wax
You’ll also need a flat surface, such as a garage floor, driveway, or street parking. Check your local laws to make sure you’re not violating any codes when using the street because we ain’t getting your car out of the impound yard.
When working with chemicals, make sure your workspace is in an open, well-ventilated environment.
Arranging Your Workspace
Organizing your tools and gear so everything is easily reachable will save precious minutes waiting for your handy-dandy child or four-legged helper to bring you the sandpaper or blowtorch. (You won’t need a blowtorch for this job. Please don’t have your kid hand you a blowtorch–Ed.)
Here’s How To Clean Your Headlights
Cleaning and Masking Your Headlights
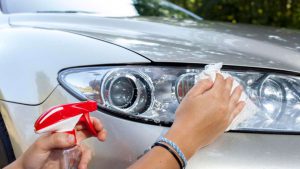
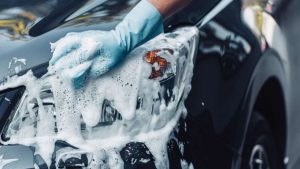
- Wash the headlight lenses, those plastic assemblies that protect the bulbs, with soap and water. Pay particular attention to any surface imperfections, bug carcasses, and any detritus that’s embedded itself into the surface.
- Dry lenses thoroughly.
- Tape the areas around the lenses to protect your car’s paint while sanding and polishing.
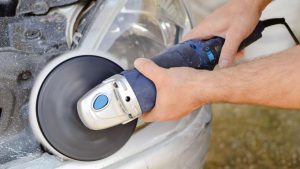
Sanding Your Headlights
- Using the spray bottle, dampen a sheet of 1000-grit sandpaper.
- Spray the entire lens with water to thoroughly dampen.
- Rub the dampened sandpaper over the lens evenly, occasionally spraying the lens with additional water to keep wet (dry-sanding the lens can cause damage).
- Continue for 5 to 10 minutes.
- Wipe down the lens with a microfiber towel and re-spray with water.
- Dampen a sheet of 2000-grit sandpaper and repeat the sanding process, occasionally spraying the lens with water.
- Continue for 5 minutes.
- Wipe down the lens with a microfiber towel.
- Repeat the wetting-and-sanding process with 3000-grit sandpaper.
- Continue for 5 minutes.
- Clean and dry the lens completely.
- Repeat the entire process with the second headlight lens.
Polishing and Waxing
- Squeeze a little polish onto a clean microfiber towel or buffer pad.
- In a circular motion, rub the polish into the lens, as directed.
- You’ll know when you’re done when the lens is clear.
- Wax the lens in the same way you’d wax the rest of the car.
You’re done!
Tips From a Pro
The Drive asked RJ de Vera, Global Customer Engagement Leader at Meguiar’s, for tips on the best methods and products to use while cleaning your car’s headlights.
- If you have headlights with light oxidation or yellowing and you want to work by hand, a basic kit is all you’ll need, can I suggest Meguiar’s® Basic Headlight Restoration Kit? With this kit it’s recommended to mask off around the headlights and soak the included pads in water for a minute. Then, you lightly sand with each of the four different pads working from coarser to finer. This is repeated multiple times on each headlight until they are clear again.
- If your headlights have heavy oxidation, and you have a corded drill (YAY, POWER), can I have you consider Meguiar’s® Heavy Duty Headlight Restoration Kit? With this kit you clean the lights thoroughly and then mask off around each light. Lightly sand with the two different grades of fine sandpaper and water. Work the first disc horizontally and the second vertically, making sure they have a uniform frosted appearance before following with the included cleaner and polish. Here you apply the polish to the included wool buff pad using a standard corded drill to polish the plastic back up to clarity. Work for 1-2 minutes wiping off the residue before it dries, then repeat this process if needed until the lenses look like new again. Clean with a good glass cleaner and apply a medium coat of the included headlight coating overlapping your passes by 50 percent. Allow to cure and apply a second coat for a thorough seal. You’re all done.
Life Hacks
Since you may not have access to the right tools, or have a friend you can bum a wrench off of, we also compiled a list of our best hacks to make your life easier and drain your pocket less.
- Make sure that your headlight bulb isn’t the problem. Older bulbs may lose intensity as they age and a simple bulb swap may be all you need.
- Common toothpaste, with its mildly abrasive properties, can be used to clean your headlight lenses. Simply dampen a clean microfiber cloth in water, add a few spots of paste, and rub into the lens using circular motions. Continue adding water and toothpaste as needed, and continue for five minutes per lens.
Courtesy/Source: The Drive


